
Building infinite scroll with virtual scroll in Ember: A step-by-step guide
With the growing size of content, there is often a need to divide large sets of content into smaller pages. Infinite scroll and virtual scroll are two techniques that allow us to divide and present content more efficiently. In this article, we will discuss both of these techniques and implement them in Ember.
What is infinite scroll?
To learn more about infinite scroll, let’s discuss traditional pagination. In most websites, pagination is a common technique for breaking huge sets of content into smaller pages, making it more manageable for users to navigate and consume. Instead of displaying all the content on a single long page, pagination breaks it up into portions. A user is provided with CTAs like next>> or <<prev to navigate between these portions.
In contrast to this, infinite scroll allows the user to keep scrolling down to load more stuff without needing to click on a CTA. Infinite scroll provides a seamless experience on large websites with many pages, such as Instagram or an e-commerce website. It loads more data by keeping track of how far a user has scrolled down the page.
Once a certain threshold—say, 70%—is breached, an API call is made for the next page. As the user completes 100% content of the first page, the next page is rendered on the screen. This improves UX by eliminating the load time of new pages.
What is virtual scroll?
Although infinite scroll improves user experience with smooth scrolling for pagination, it can render hefty amounts of content on the browser, which can cause performance issues because it takes memory and CPU power to render everything on the screen simultaneously.
Virtual scroll, on the other hand, loads only a portion of the items—the ones you can currently see on your screen. This makes it feel like you’re scrolling through an endless list of items, as the list keeps growing at the bottom while removing items from the top.
Why build it from scratch?
Over the different versions of Ember, many changes have been introduced to the framework, and not all of these changes are necessarily backward-compatible. This means code and add-ons that worked perfectly in one version of Ember may require modifications or updates to function correctly in a newer version.
Finding an add-on that supports the specific version of Ember your application is using can be challenging. And even after identifying the appropriate add-on, getting it up and running smoothly in your project can be tiresome. It may involve configuring settings, dealing with potential conflicts with other add-ons or dependencies, and addressing any breaking changes introduced in Ember updates.
Even when we manage to find an add-on that is compatible with our project, locating a virtual scroll add-on that can handle dynamic heights without requiring prior knowledge of the number of nodes is quite tedious.
How to implement a basic infinite scroll
An infinite scroll consists of some key blocks:
- Scroll container: The main container responsible for showing the content. We listen to the scrolling events on this container to identify whether to fetch the next page or not
- Collision detection: In the scroll container, we need to detect if the user has scrolled to the bottom of the page or an imaginary point in the container
- “Load more” action: Once the collision is detected, we need to make an API call to fetch the next page
- Records modification: New records received from the API call need to be added to the existing records
As part of this process, we are implementing a generic higher-order component that can be used across the product. The functionality of the component will be to run an action/function whenever a collision is detected in the scroll container. The higher-order component (HOC) would accept the below params:
- hasNext: Boolean variable to identify if the next page is available
- nextLoading: Boolean variable to identify if an API call is already running; this is needed because sometimes API calls can take longer to provide a response, and we shouldn’t make the next call unless a previous call is resolved
- next: a function that triggers when a collision is detected; this function should take care of calling the next page API and appending next-page data to the existing set of data
Infinite scroll implementation
We make use of the didRender hook to add an event listener to the scroll container with the ID “basic-infinite-scroll.” This listener will check for changes in what’s visible on the screen. Importantly, we’ll remove this listener once the user triggers an action to load the next page. After the new page loads, didRender will help us to set up a fresh scroll listener. (Learn more about didRender from Ember guides.)
The “scrolledTill” variable keeps track of how far the user has scrolled down the page in the viewport. We’ll use this variable in later sections when implementing virtual scroll behavior.
(Note: There are other ways to make an infinite scroll with a MutationObserver. Learn more about MutationObserver from MDN docs.)
In this example, we’re keeping things simple. We make a new API call whenever the user scrolls down to about 70% of the entire scrollable area. We call it “bufferPercentage.” This approach might not be the best one—custom calculations could be used with respect to requirements.
Unset
<div id="basic-infinite-scroll">

{{yield}}

</div>
JavaScript
didRender() {

this._super(...arguments);

this.addInfiniteListener();

},

addInfiniteListener() {

const scrollListener = (e) => {

const {

scrollTop,

offsetHeight,

scrollHeight,

} = e.target;

constscrolledTill = get(this, 'scrolledTill')

if (Math.abs(scrollTop - scrolledTill) > 50)

set(this, 'scrolledTill', scrollTop)

const bufferPercentage = 0.7

const scrollThreshold = (scrollHeight - offsetHeight) * bufferPercentage

if (scrollTop > scrollThreshold && get(this, 'hasNext') && !get(this, 'nextLoading')) {

this.sendAction('next')

wrapper.removeEventListener('scroll', scrollListener)

}

}

const wrapper = document.getElementById('basic-infinite-scroll');

wrapper.addEventListener('scroll', scrollListener)

 }
Ramp infinite scroll to virtual scroll
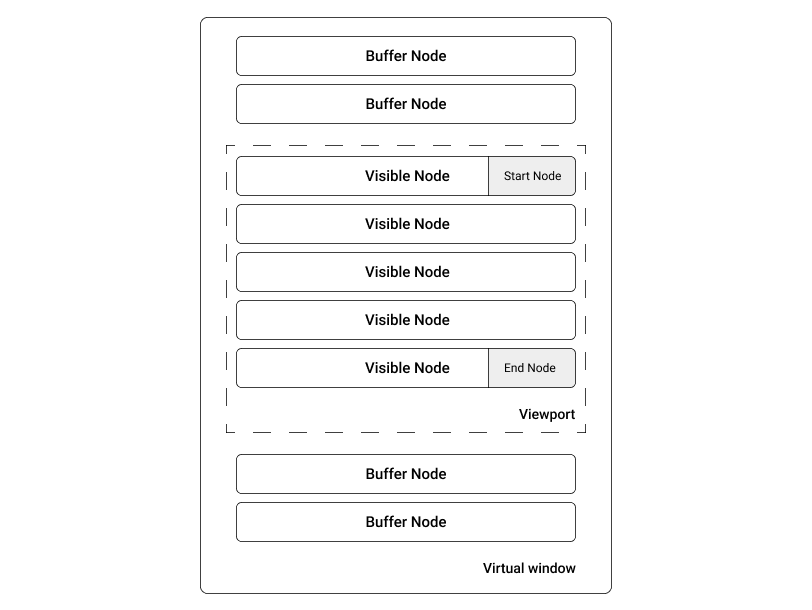
The subset of nodes consists of:
- Buffer nodes are extra nodes kept on both top and bottom that are visible on scroll for a user to feel nodes are present on both sides
- Visible nodes are the nodes present in the viewport. This is identified using startNode and endNode integer variables
We do a basic transformation of adding an ID to records, which is further used while caching heights. We use buildRecords in didReceiveAttrs, which makes sure to rerun every time records change. (Learn more about didReceiveAttrs from Ember guides.)
JavaScript
buildRecords() {

const records = get(this, 'records')

records.forEach((element, idx) => {

set(element, 'id', idx)

});

}

didReceiveAttrs() {

this._super(...arguments);

this.buildRecords()

}
Infinite scroll relies on tracking how far a user has scrolled on a page. The size of the content nodes is essential for this calculation, but sometimes these nodes can have varying sizes.
To keep track of where the user is on the page, we add up the heights of the nodes currently visible on the screen. This total is essentially the height of the part of the page the user can see, called the viewport height, and we store this value for reference.
However, there’s a catch. To know the height of a node, it must be rendered in the first place. To overcome this limitation, we use something called a tolerance height. This is a predetermined value that we use as a placeholder until we can calculate the actual height after rendering the node. It helps us estimate the position of the user on the page more accurately.
We initialize a variable “cacheRecordsWithHeight,” which stores the heights of all the nodes. This height could be the original height (if the node is already rendered) or the tolerance height, which is 200 pixels in our case.
We recalculate the heights on every change of render using the “recalculateHeights” function. To get the height of the rendered node, we need to add an ID (#virtual-record-${index}) to DOM nodes. We try to query the DOM element with this ID and use the client height if the DOM element is present.
JavaScript
didRender() {

this._super(...arguments);

this.addInfiniteListener()

this.recalculateHeights()

},

cacheRecordsWithHeight: {},

recalculateHeights() {

const {

cacheRecordsWithHeight,

records

} = getProperties(this, 'cacheRecordsWithHeight', 'records');


let cache = {}

for (let index = 0; index < records.length; index++) {

if (cacheRecordsWithHeight[index] && cacheRecordsWithHeight[index].originalHeight) {

cache[index] = cacheRecordsWithHeight[index]

} else {

const row = document.querySelector(`#virtual-record-${index}`)

cache[index] = {

originalHeight: row ? row.clientHeight : false,

toleranceHeight: 200,

}

}

}

set(this, 'cacheRecordsWithHeight', cache)

}
We calculate the sum of node heights from the beginning to the “startNode” and use this value as padding-top for the scroll container. This padding-top creates the visual illusion that there are more nodes above what the user can currently see on the screen.
Here’s how we calculate the padding-top value to achieve this effect:
JavaScript
paddingTop: computed('startNode', {

get() {

const {

cacheRecordsWithHeight,

startNode

} = getProperties(this,

'cacheRecordsWithHeight',

'startNode');

return Object.keys(cacheRecordsWithHeight)

.slice(0,startNode)

.reduce((sum, curr) => {

return sum += cacheRecordsWithHeight[curr].originalHeight||cacheRecordsWithHeight[curr].toleranceHeight

}, 0)

}

})
Now that everything is in place, we need to calculate startNode and endNode.
To determine the startNode, we calculate it by considering the current position that has been scrolled and comparing it with the cached heights of all the records. Calculating the endNode is relatively straightforward: We simply add the number of items in the viewport and the buffer count to the startNode to find the endNode. This helps us identify the range of records that should be visible on the screen.
JavaScript
startNode: computed('scrolledTill', {

get() {

const { scrolledTill,cacheRecordsWithHeight } = getProperties(this,

'scrolledTill',

'cacheRecordsWithHeight',

);

let sum = 0;

const start = Object.keys(cacheRecordsWithHeight).find(

(record) => {

sum += cacheRecordsWithHeight[record].originalHeight

return sum > scrolledTill

}

)

return parseInt(start) || 0

}

}),

endNode: computed('startNode', 'records', {

get() {

const {

startNode,

records,

viewportBuffer,

bufferNodes

} = getProperties(this,

'startNode',

'records',

'viewportBuffer',

'bufferNodes');

return Math.min(records.length, startNode + viewportBuffer + bufferNodes)

}

}),

currentView: computed('startNode', 'endNode', {

get() {

const { records, startNode, endNode } = getProperties(this, 'records', 'startNode', 'endNode')

return records.slice(startNode, endNode)

}

})
Unset
<div id="basic-virtual-scroll" style="padding-top:{{paddingTop}}px">

{{yield currentView}}

</div>
We yield the “currentView”, which is the subset of visible nodes. This yielded value could be used by the child component to display the records.
In summary, we have discussed infinite scroll and virtual scroll and why to use them. We have also implemented a basic yet generic version for both infinite and virtual scroll.
Production-ready code may involve additional considerations beyond what is presented in the article. Some of those could be:
- Make use of a mutation observer instead of relying on scroll listener and element heights, as DOM operations are expensive compared to a MutationObserver
- As mentioned in the “Infinite scroll implementation” section, the use of the “bufferPercentage” approach for collision detection may not be optimal. An alternative approach is to utilize the remaining height in the scroll container. For instance, you can set a “bufferHeight” threshold, such as 300 pixels. Whenever the remaining height in the container becomes smaller than this “bufferHeight,” you can trigger the next API call. This approach can provide more precise control over when to load the next set of data based on the actual space available in the scroll container, ensuring a smoother user experience

